Introduction
[specs-box]
Marvelous Designer is a stand-alone package that allows the
user to design and physically simulate 3D virtual clothing. It is
developed by CLO Virtual Fashion, headquartered in Seoul, Korea. The
first official release of a CLO Virtual Fashion software took place
back in 2009 and was named CLO3D. Despite its initial instability and
the lack of basic features, such as Undo, it had already convinced
early adopters that saw the potential of the toolset.
Today CLO3D is used by the fashion/apparel industry, while
Marvelous Designer (MD) is used in film and VFX (Weta digital – the
Hobbit), games (EA, Ubisoft, Konami), and architectural previz. The
developer has quickly built a growing community around its software and
has kept releasing improved versions, year after year.
The features introduced in Marvelous Designer 5 aim to simplify and streamline
its workflow. Does it deliver on the promise? Let’s find out.
It’s all about the pattern
Just like its predecessors, MD5 is using a pattern-based
approach. The user gets to navigate between a 2D and a 3D view. The 2D
view is used to design, cut, edit and shape 2D patterns. You can create
and edit predefined geometrical shapes such as rectangles and circles,
or any other user-defined polygon shape. In addition, it provides
interfaces to move points and segments manually, or through input
value. The 3D view is used to simulate the garments using physically
accurate rules. You can push and pull in the 3D view and see the
draping in real time. You can also dynamically edit the pattern in the
2D view and see the results right away in the 3D view.
The simulation result also depends on the type of materials
assigned to your patterns. You can use presets such as cotton, denim,
and leather, that are already setup using physically correct
properties, or you can go in and edit the physical properties of those
presets to get the exact look you have in mind.
Of course, most of the time, you will need an avatar to drape
your garments around. Basic avatars are provided in the package but you
can of course import an avatar of your own.
Physical simulations can get really heavy and slow. To address
this issue, Marvelous designer implemented, in the early releases, the
concept of particle density. You can start your simulation with a low
value of particles (such as 20), and then slowly build your way up to
the finest values (such as 3 or 4). The lower the value, the fastest
the simulation, the higher, the slower, but also the more precise.
The heritage of versions 4 and 4.5
Marvelous Designer 5 announced a whole bunch of new features
that we will go through shortly. Some of them are worth considering in
the context of MD4 and MD4.5 new features. Among the features of those
versions, one can find: Quandrangulate (to turn those triangle meshes
into quads – more on that later), tacking patterns together or on
avatar, 1 to N segment sewing, and piping of the seams. More
importantly, symmetrical paste, editing and merging, and normal
flipping. Those 2 features are for me the most significant and they
will come into play when evaluating the features of version 5.
Symmetrical paste, edit and merge was in my opinion one of the
biggest improvements since the addition of the undo. Before that, when
you would change one piece of a garment, you pretty much had to
manually do the same change to the other
« theoretically » symmetrical side. That feature now
enables the user to edit one piece, while propagating automatically
those changes to the other side. I know it seems quite basic, but it is
such a productivity boost.
The other important addition was the normal flipping. Before
then, it was a bit tedious to both see the direction of the normals of
a cloth panel and flip it whenever facing the wrong direction. With
MD4, users were now able to flip panels in a single click, which helps
tremendously give thickness or linings to your garments.
What does version 5 have in store?
The features of MD5 are one more step towards simplifying the
workflow. The intent is to make the creation process easier, faster and
more streamlined.
Cutting patterns

The developer strikes hard with this long awaited feature. In
previous releases, changing your mind on your design late in the
process was extremely tedious. If you wanted to split a pattern, you
pretty much had to redo it from the start, but this time in pieces.
This is now a problem of the past. This tool lets you split any pattern
with an internal line. It is as simple as drawing the line, right
clicking and hit « cut ». This is extremely useful
for designing the overall look and silhouette of a garment before
refining the shape, like adding extra stitching. You can of course
select multiple lines at the same time. Simple. Efficient. A nice
addition to that feature is the “cut and sew” mode: it enables you to
split and then stitch the two pieces together at once.
However, the whole thing is not without minor flaws. If your
patterns were set as symmetrical, then cutting on one end will delete
the symmetry. It will not replicate the cut on the other side. It is
unfortunate, but it is not that bad: the newly created parts can be
mirrored in symmetry again after the split and you are back with
dynamic symmetries. The feature is powerful indeed but can get buggy at
times especially the “cut and sew” mode. I got myself cornered with
some panels that were cut and sewed together without the ability to
select or edit the sewing. It completely disappeared from the list of
sewing and I could not click on it ever again. Only restarting the
software fixed the problem. If this is confirmed as a bug, let’s hope
it will be patched in an update.
Trace
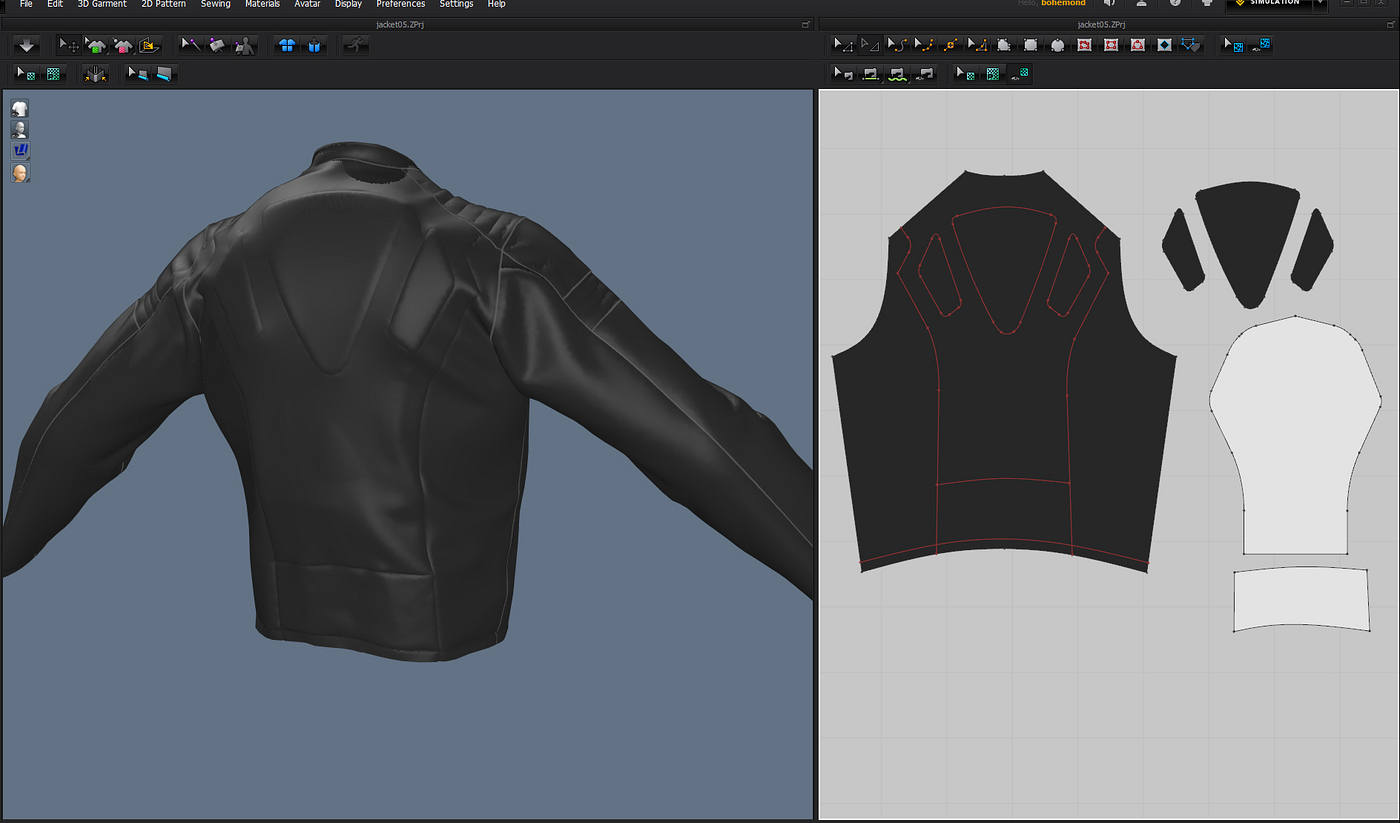
The other major feature of this new release is trace. Trace is
a new function with its own button in the toolbar. Draw a few internal
lines, select them, and click on the trace button (shortcut I). Right
click on the lines to create a pattern corresponding to the
intersection of those lines. You can do the opposite and create an
internal line from the outline of a pattern. This is extremely powerful
when you want complex patterns and lines that match 1 to 1 so you can
stitch them together.
The padding of the motorcycle jacket on the image was
done within minutes using this technique (also combined with the
power of the layers). This feature is particularly convincing to me.
Offset as internal lines
Often times, you will want to draw internal lines. You will
want them with a clean offset from the border in a uniform fashion. In
previous releases you would have to do this manually. This too, is also
a problem of the past. Clicking on « offset as internal
line » now gives you a contextual menu to enter a distance
value. Within a split second you get a clean internal line as if you
had done an inset in 3DS Max (or any equivalent 3D package). Let’s also
notice that of course, you can reverse the direction of the offset if
you need to.
Direct positioning
Here is a more subtle, yet valuable, detail to speed up your
workflow. You can now position shapes and objects onto a surface
(garment or avatar) within a click. The developer enriched their gizmo
with a small target icon. Clicking on it then on the surface snaps the
object wherever you want, including on the surface of an avatar. Click
on the surface again to confirm the move. Undo works well in this
context too.
Fold arrangement
If you have ever tried to make a shirt or a jacket with a
collar and cuffs, you know the pain. This feature tries to fix it at
once. You first need to draw an internal line, just like you would in
previous versions. But now here is the beauty: the fold arrangement
tool lets you select that line and then gives you a gizmo to pick the
direction in which you want to fold the panel. Simply rotate the gizmo
and your panel is folded already. Do not be scared to screw up the
simulation. The folding works before the simulation is activated. More
on this very nice feature in a few moments.
Sewing line type upgrade
This is nothing more than a new option for the sewing lines.
Changing the type from “Flat” to “Turned” will give you a different
look that will look more folded.


Nice review. Thanks.
Strange interface. Illogical cloth setup process. Why a mesh quality (density) called particle distance ? VERY clumsy work with avatars. Inconvenient gizmo. But, yes, speed simultion is good.
The price for individual artist only.
For company, $4,000 or $1,400/year.
If you want network lic, $6,000!