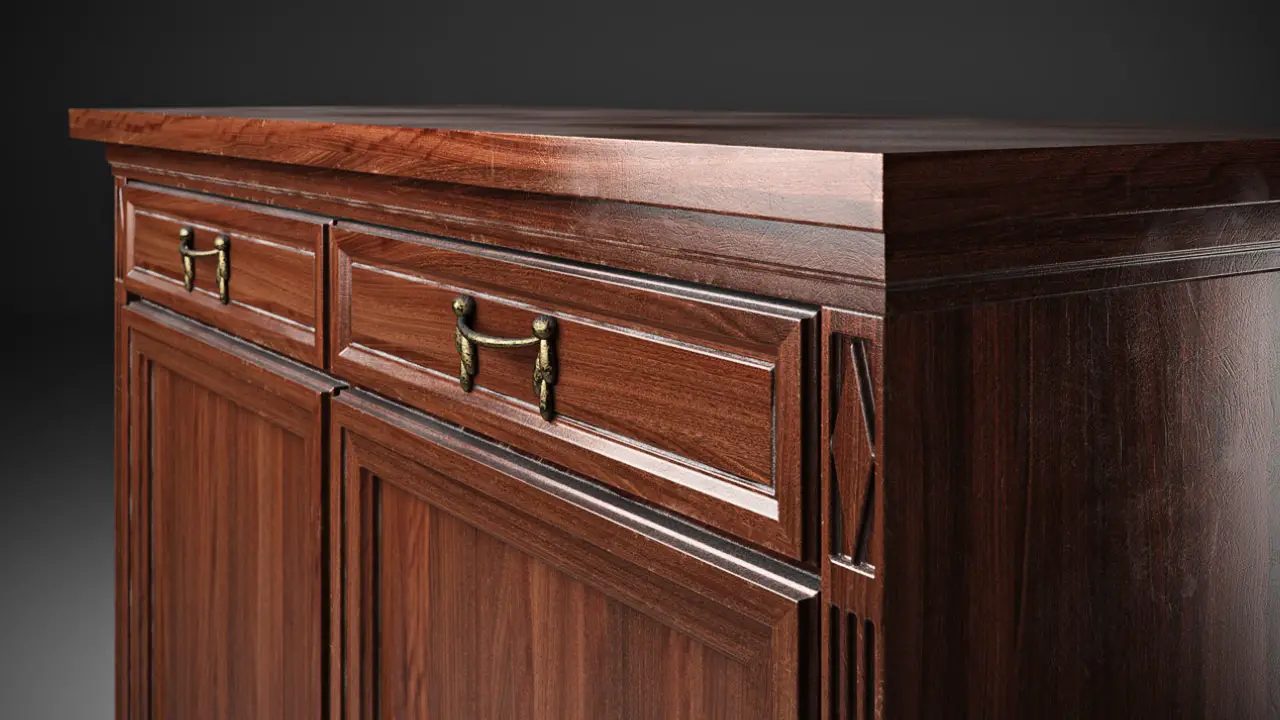
Introduction
We are going to look at some real world photos of antique wood, analyze the main features and use some advanced material creation techniques to re-create that look with V-Ray.
Instead of unwrapping all the objects and painting custom maps for them, we are going to use a procedural approach. This method is quicker and the resulting material can be re-used in other projects.
The result is also very flexible – since I’ll be using a layered approach, I can turn off or modify features like worn edges or dust.
This tutorial is not meant to just show you how to create wood, it’s also meant to show you how you can achieve complex results using some simple V-Ray and 3DS Max maps. You can use these methods for a multitude of other materials and adapt/develop them as you see fit.
Subjects covered: V-Ray material creation techniques, using vrayblendmtl for complex layered materials, using vraydirt and falloff maps as procedural masks.
The Tutorial
Part 1 – Wood
Part 2 – Lacquer
Part 3 – Worn edges
Part 4 – Dust
Download the files available for this tutorial:
– dirt.png
– scratches.jpg
– smudges.jpg
– wood_scene.max
You can download the starting scene and the b&w textures I used HERE. I haven’t included the wood texture because of copyright issues, but you can use any wood texture you have available!
Learn more advanced V-Ray material techniques:
If you would like to learn more about creating quality V-Ray materials, including Photoshop techniques for tileable texture and dirtmap creation, check out Viscorbel’s Creating V-Ray Materials premium video tutorial series.

Austris Cingulis is a self-taught 3D artist based in Latvia. He has almost 10 years of experience with 3DS Max and a background in arch-viz, product-viz and game industries. Currently Austris is producing training materials for 3DS Max and V-Ray. You can check out his free and premium tutorials on his site VISCORBEL.COM.


Excellent texturing. Thanks for sharing this tutorial..I will post a link of ths tutorial on my blog.
Thanks – very nice of you to share this high quality tutorial:) The brass material did not work in my scene – it stays gray. Any tips?
Great tutorial, really well explained and an interesting technique. Thanks 🙂
Thank you “Austris” for your tutorials .
Wow really amazing tutorial Thanks a lot!
Great tutorial, it’s just taken my modelling to the next level. My clients always complain that my models are too clean. Not anymore!!
I did find it a litle quick though so had to keep stopping and going back.
Thanks for such a comprehensive tutorial!
texture link is broken. please re-upload it…
Download link no longer works. Could you please update it?
Well explained and easy to follow, thank you for this excellent tutorial!
Amazing tutorial, thanks a lot!
Hi There
Excellent texturing. Thanks for sharing this tutorial
but I can’t access to the files available for this tutorial…
would you help me?
THanks
I am so glad that your pictures showed how to apply the different textures to the material. That dust mask really helps the wood look really realistic in the V-Ray render. I wonder how you would go about using V-ray materials in game engines.