
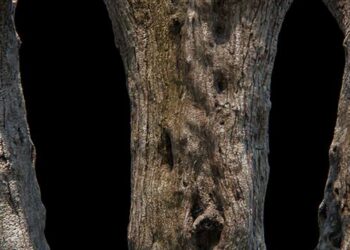
Corona Materials

Different materials configured just with procedural maps, including the volumetric one based on a simple geometry with a few noises applied to it, I used the public sample model from the Corona Materials Library website
The first time one opens the material editor and looks for
Corona materials, one is probably expecting to find a standard set of
specific materials and some sort of
light material, especially considering this just a v1.1
version of the render engine. And you’ll
indeed find this, but you’ll also find a rich collection of materials,
such as the CoronaRaySwitchMtl, which lets you specify different materials
for different ray types – think for example about a red ball
that bounces too much red light, and that the director wants
to avoid that kind of color bleeding. In that case you’ll use this
material to configure the Red material as the directly visible
material, but a less saturated or different material for the GI rays,
or the reflected rays or the refracted rays. It opens a big world of
possibilities to adapt your scene to your needs, without having to tweak thousands of
settings.
There is also a CoronaShadowCatcher material that lets you
integrate your characters and objects with photographs or footage. It’s Corona’s own
Matte/Shadow material and it works pretty well, in various situations.
Also of note, there’s a CoronaVolumeMtl. At first you’ll think
that it may render voxel-based simulations like FumeFX’s, but it’s a
geometry-oriented material. It works with any geometry, so you can for
example render clouds defined by
geometry. There have also been examples of FumeFX simulations
converted to
geometry using Frost and Krakatoa and rendered with this
material
achieving a pretty decent result.
The CoronaVolumeMtl also allows to create volumetric fog and
different effects like god rays and volumetric shadows.
Regarding the standard Corona material, it’s an easy to use shader based on the GGX model. It offers different options like volumetric scattering, translucency without having to use SSS and a few effects like rounded edges. It’s a good material that allows you to build your desired shader in no time.
Corona Maps

Corona’s physical sky system at work
The list of available maps in Corona is pretty good. There are some
render-specific Corona maps, and there are some which are enhanced
versions of the
ones that come with 3DS Max.
Corona AO: a good Ambient Occlusion map filled with advanced
AO features
like inverted normals exclude/include options, directionality, and some
more. It’s great to create a simple AO effect and useful also
to use it as mask for
other textures – in combination with the CtexMap render element it
gives you
a very advanced Ambient Occlusion render pass.
Corona Color: I’ve been missing this feature in Max for ages.
A pretty advanced color node that allows you to configure your
color in different ways, like creating an HDR color, using the old HEX
input
to use web colors, or define the color using a temperature value. Very
useful.
Corona Normal: a node to use Normal maps in Corona, useful
with some normal
map-related features such as flipping channels and exclude the loaded
bitmap
from Gamma.
Corona Output: using this map you can exclude any texture from
being
affected by color mapping, so it’s useful for light textures,
backgrounds
and many other situations where you may want to avoid color mapping
in your texture.
Corona Sky: I bet you know what this is, Corona’s own physical
sky.
Corona Wire: finally a proper way to render wire frame with
full control over its look. This map gives you the ability to use the object
wireframe as a texture: you can define whether you want to show lines and/or vertices, and you can define its aspect using World Units, so the size remains stable in the world space. You can also use pixel size, so it
adapts to your output size. There’s also an “All Edges” feature that allows to
show ALL the object edges; if disabled it will just show the visible edges.
This map is a great tool to render wireframes.
Corona RaySwitch: this map does the same as its
Material counterpart. It allows for example to define a different color
for the GI rays. You can use for this for a bright beautiful orange, so that the
reflection is not as bright, and define other colors
for Direct Rays, Reflection Rays or Refraction Rays. In the end you can
render an orange that reflects green light, it’s seen in
mirrors as a red orange and can be seen in green through some magical glasses. 😀
Corona FrontBack: a simple but powerful map. It
allows you to define a different color/texture for the front face and the backface of your
object – useful for leaves and papers, for example.
Corona Multimap: the equivalent of the Multi/Sub-Map. A great
map to use when one has lots of instanced objects, where you can define
a different set of textures to each object based on different parameters.
It’s great for building a forest with just one material, for
example.
Corona Mix: an improvement over Max’s own Composite map. It’s
limited to two maps, Top Layer and Base Layer, and one mask. But you
may use
multiple nested maps to achieve the same effect as with the Composite
map, with the advantage that it will render more efficiently.
Corona Bitmap: a Corona-specific replacement for Max’s bitmap map that
that brings rendering speed increase of 10-20%.
These are the maps available so far. As you can see it’s a
pretty powerful collection that I’m sure will be improved over the time.
Render Elements
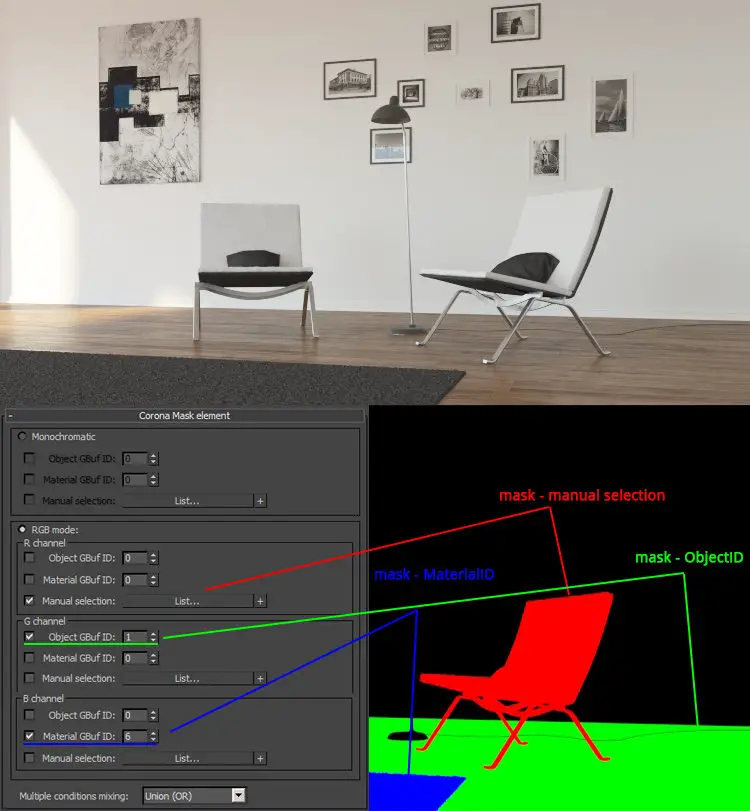
Masks can be created by specifying Object ID, Material ID or by picking objects from the scene. Materials can also be made invisible to masks while staying visible in the beauty pass, which is useful for when you want to create masks for objects behind glass panels.
This is another area where Corona shines. The 1.1 release already comes
loaded with a lot of different elements to give you as much
control as you
may need for compositing your scenes. The only negative thing I’ve noticed is the absence of a velocity render element to be able to apply motion blur in post. Leaving that aside, it’s a quite complete set of render elements.
The list is quite long and goes from a CMasking_Mask element
that will allow you to generate an old fashion alpha matte as well as to have the RGB matte divided into one matte per
channel, to the most advanced Cshading_Albedo that will allow you to debug your scene to see which materials or maps are making your scene noisier
or slower.
Interactive Rendering
In my experience interactive rendering in Max (a.k.a. Activeshade)
usually has had some cons in the past. The computer became
slow, the scene had to be reloaded very often (which
kills the interactive feeling and feedback) or the refresh resolution
of the render was too low so you would lose track of the previous image to compare.
In Corona I’ve found the best Interactive Rendering experience
I’ve seen so far. It is fast, especially if you use PT+PT. The big changes are transferred very
fast to the engine so it does not have to start as often as other engines,
and you get results pretty fast too. Also, almost all the main render engine
features work in IR, so there is no difference between the IR and the
final render output.
There are of course things that can be improved, for example
you have to start a normal render before starting an IR session so the window has
your desired output size. But I take it all these small caveats
will be solved soon.


