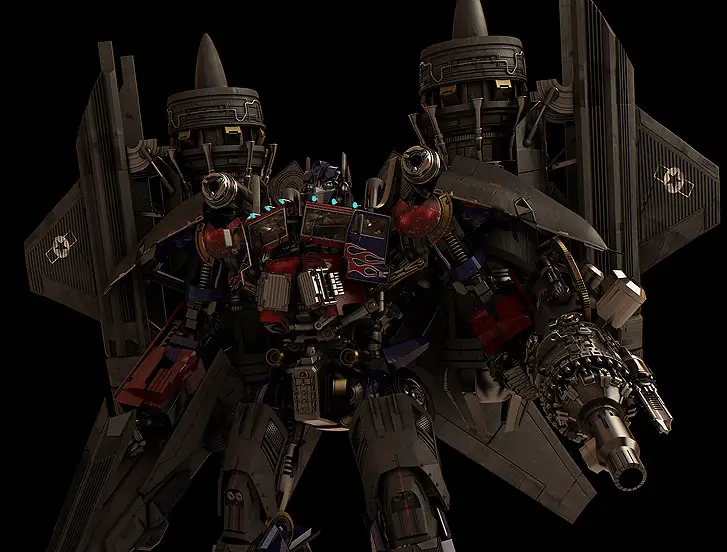
Attempting the difficult is a personal project, inspired by the excellent work done by ILM for the Transformers feature film. The goal was to build, rig, animate and render a complex model with modest equipment and learn from the experience. My version is an approximation of, and a tribute to ILM’s great work. They have been an inspiration to me since Jurassic Park.
Modeling
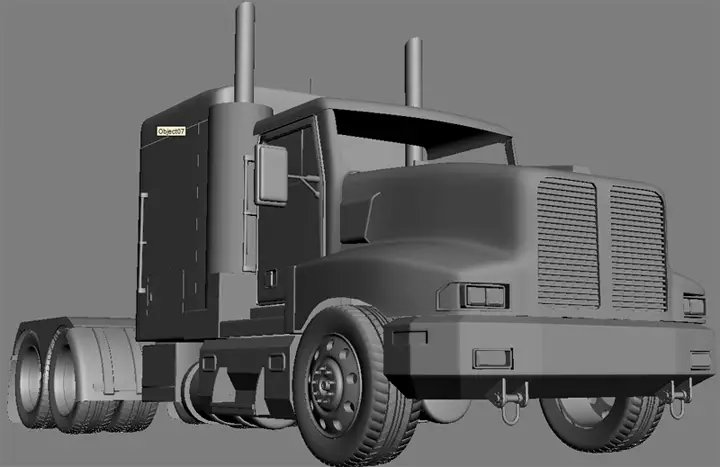
I started the modeling stage building the truck, initially working on a modern-looking version but eventually changed the idea and went back to a more traditional-looking one. For this part of the process I used a lot of reference images of Peterbilt trucks I looked up on the web.
The method used to model the truck was blocking the general shapes with simple geometry, and then doing retopo over the basic shapes and adding detail where needed. I tried to avoid using meshsmooth to maintain the polycount low, but in some areas it wasn’t possible to avoid using some kind of smoothing to achieve nice curved surfaces. In these cases, I later collapsed the mesh and did manual optimization, reducing the polycount.

The complete external geometry of the truck was modeled in 4-5 days. After that I moved on to working on the head, and that’s where problems began. I don’t usually use 2D reference images inside Max when I model (or blueprints). I work with multiple monitors, so I put the reference image on one screen and model on the other one. In this case, the reference image (a still from the film) only showed a part of each one of the pieces that make up the head.
This stage presented a lot of challenges because multiple pieces must fit together as one model with the ability to move and transform the model’s overall shape, so it wasn’t possible to model each piece and then try to fit them seamlessly. Also, modeling the head as one mesh and breaking it apart wasn’t going to work, because the pieces were going to be hollow and redoing the inside part of each piece wouldn’t have been very efficient. In order to solve the problem I combined both methods.
First I modeled a quick low poly general shape with the correct volume and form with a transparent shader applied so that I could use it as a 3D “ghost” guide. Then I started modeling each piece and assembling the head at the same time. This way I could model with precision and make sure that the model’s ability to “transform” was possible.

For the mechanical-looking pieces I used the spline modeling technique(in most cases). Using booleans for modeling is not a good choice in my experience, but I found an acceptable way to using it sometimes when I need it. You can check the video below for an example of how to use booleans successfully in 3ds max.
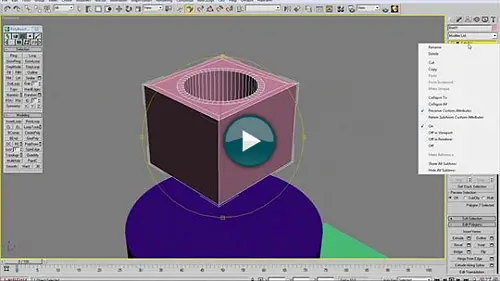
How to use Booleans sucessfully in 3ds max


Very impressive! (-:
this is really amazing, your work is really inspiring!
Amazing, great job !!!
I am an animator and there is never a day that you don’t learn. Thanks for the article. Your work is awesome!
woow buddy… awesome!!!!!
Nossa, muito bom.
awesome woRk dude……really cool modeling and thax 4 sharing this……>>>>>>>>
Thanks for your words guys!! i am really glad you like it , and thanks to maxunderground for the oportunity to share this experience here!.
Best Regards!
Luima.
Man, unbelievable!
My seriously congrats.
Hi Luis, I truly say it’s awesome…great work. I’m also great fan of ILM.
I’m trying to do the same …it’s in progress,meanwhile, I found your post and it is really very helpful to me thanks for that. I’m creating optimus in maya…
I just want to know little bit more about rigging. So please reply me and if you don’t mind plz tell me more about it.It will help me a lot.
THANX…
This is a total overkill. In every single aspect 🙂 I can’t remember seeing a non-commercial work done with so much details!
great jobs,
nice arts
Really is a great project, model can be downloaded?I want to put him into the toy.Or you can say to sell.Thank you very much