LiveLight
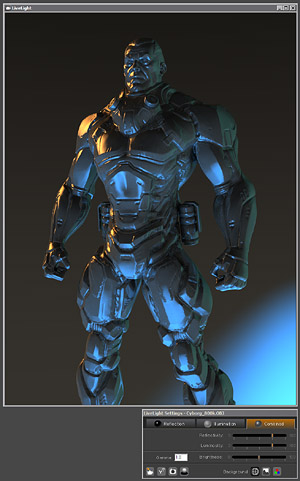
The LiveLight preview window shows the illuminated 3D model and there’s also a small floating LiveLight Settings panel where the model’s reflections and a few other settings can be adjusted.
LiveLight’s design goal has been to help users see reflections with varying strength and illumination. As such, there’s no concept of material in LiveLight, just varying types of reflection. You have three different modes available:
– Reflection only mode, which shows only the reflection, resulting in a chrome-like end result
– Illumination only mode, which shows diffuse lighting
– Combined mode, which shows both diffuse lighting and reflection
To visualize the lighting design, you can use the existing default teapot or load custom objects. 3D files can be loaded in as .dae (Collada), .mi (Mental Ray native file) or the traditional .obj (Wavefront) file. Multiple camera views can also be used from Mental Ray and Collada files. You can select the camera by just clicking the Choose Camera button and the view is switched to the camera.
Collada support, new to version 3.0, means that you can now load scenes with cameras from Maxon’s Cinema 4D, Luxology’s Modo and Newtek’s LightWave 3D, among other software.
The LiveLight window will show a rough progressive render in fractions of a second, so you can move lights, adjust exposure and tweak other parameters and get feedback in a dynamic fashion. With lightweight models rendering is very fast, but with more complex models, closer to 1 million polygons, rendering of illumination only (diffuse material) or combined reflection and illumination is significantly slower depending on the CPU power available.
The LiveLight preview system is purely CPU based and multithreaded, GPU acceleration is not supported, which might feel like a downside, but on the other hand, this means that you don’t need a special graphics card with lots of memory if you intend to use complex objects.
The 64-bit version of LiveLight can load huge models (Lightmap claims files larger than 1Gb can be loaded). We tested quite large obj files from ZBrush, Mudbox and 3ds Max, and they loaded just fine. Sometimes models load with the wrong up axis, depending on the original exporter, but luckily LiveLight settings have a button that allows to select the correct up axis, which solves the issue.
A background image can also be loaded into the LiveLight window; supported formats are .bmp, .jpg and .tif files. This background image will work as a photographic backplate and won’t affect your HDR background. It would have been nice to have support also for .exr and other HDR images, and the ability to also adjust exposure of the background image. You can also use a flat background color, which is very useful if you want to see the lighting without the reflection environment visible.
An option exists for floor shadows, which will be created based on the lowest point in your 3D model. This helps give the impression of your model being grounded in a more realistic manner and you don’t need to import a ground plane geometry. Floor shadow causes quite a performance hit, so in some cases it may be good to switch it on only when you’re closer to finishing your lighting design.
Live Plugins
HDR Light Studio Pro now includes direct support of various 3D software via plugins. This means you can see the HDR Light Studio window in your 3D software and you can dynamically generate lighting, design reflections and render an HDR background within the software. The Live plugins don’t utilize the LiveLight view: visualization is done purely by the specific software’s renderer.
For example, with Maxwell render you can adjust light sources in the HDR Canvas interface and then see the results in real-time visualized with Maxwell studio’s Fire interactive renderer viewport. With this kind of interaction you probably will achieve a boost in your creativity as you don’t have to jump from one software to another all the time, and you can make hundreds of iterations of your lighting setup in minutes.
The number of supported platforms is limited and there’s currently no plugins at all for 3ds Max, Maya or Softimage. The plugins are split into two groups, CORE and additional Live plugins. CORE plugins include KeyShot by Luxion (version 2.3 and above, Windows only), Maxwell Render by Next Limit (version 2.5.1) and Deep Exploration (version 6) by Right Hemisphere.
Additional plugins exist for VRED (version 5.0 Professional, Photo and Essentials) by Pi-VR and also for Patchwork3D 5.0 by Lumiscaphe. These plugins are optional add-ons and can be purchased separately.
Generating HDR Images
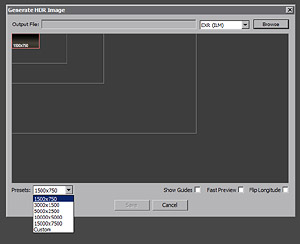
When you have finished your HDR background, you can render it out as an image. The Render Settings panel, which can be accessed via a render button in the main window, contains all related render settings. You can render out images in either .exr format (OpenEXR by ILM), HDR (Radiance) or use the Live mode. Rendering speed is fast and you can render very large images without problems.
Live mode doesn’t output any files, instead it renders the background and then sends it back to LiveLight, which allows you to view a model in the LiveLight window with a render-quality background. This provides a more accurate representation of the lighting and reflections.
You can also render the background with transparency in .exr format, which includes an alpha channel. This might be useful if you want continue exploring with a specific lighting setup, combine it with another image and do whatever processing is necessary to achieve your goal.
A "Show guides" option allows to render latitude-longitude guides to help verify and adjust the orientation of the rendered map in your rendering software and there’s also an option to flip longitude when the map is rendered. There’s an old fashioned shortcut to render again using the same settings by clicking the Render button with Ctrl key pressed. While useful, it might have been nice also to have a clearly visible "use previous settings" button in the user interface.
One thing that is slightly annoying is the way the size of the rendered image is set: you can drag the box in the window or pick a preset resolution from a drop down menu, but strangely enough, there’s no numeric input for resolution. Also, if you render out an image where you have used an HDR background, the resolution will be set to the resolution of the used background. While this produces pixel perfect result, it also forces you to use Photoshop or other software to scale your HDR images to the desired resolution afterwards.

