SimpleEdit
SimpleEdit and SimpleCreate are the original Topogun geometry creation tools.
SimpleEdit can be used to manipulate scene geometry components in several different modes. Faces, edges and vertices can be manipulated one by one or in grouped selections, using the transform manipulator.
The tool enables user to quickly select edge rings and loops. You can also insert edge loops interactively with realtime feedback, remove edge loops and also collapse edge rings. Likewise, vertices can also be merged.
SimpleCreate
Simplecreate in turn can be used to create edges and vertices on top of the reference mesh. When Topogun detects a possible tri / quad polygon face, it will be created. Simplecreate can also be used to split existing edges.
One noteworthy fact is that Topogun works only with tris and quads, so you have to take this into consideration if you’re used to creating many N-gons and then splitting them after you’ve decided where to have the edges.
Both SimpleEdit and SimpleCreate seem to have some slightly unintuitive aspects to their usage. It would be helpful for the user if the most important shortcut keys and functions available for these tools could be shown somewhere on the screen when active. Some of their "hidden" features are not so obvious, so one may only find out about them by reading the manual carefully.
Also, some operations require you to swap between these two tools, such as, for example, creating a detached edge. This may initially be very confusing, unless you’ve realized that the right mouse button (and C / T keys) can be used to swap these tools.
Bridge and Draw
The Bridge and Draw tools (which were available in Topogun 1.0) now support symmetry. Bridge is a fast way to fill holes between edges. The Draw tool allows you to use free-form sketching to produce geometry in a few different ways.
Draw offers four (4) different drawing modes – Line, Loft, Eraser and Sweep mode. With the new Sweep mode, you sketch a line along the length of a part of your reference mesh, like a leg or an arm, and then just define the number of steps. You get a swept geometry wrapped around the specific part of your reference mesh.
New Tools in Topogun 2.0
Brush
The new brush tool lets you modify the mesh using a soft selection, and it also works with symmetry. You can modify the size, strength and falloff of the brush. You can limit a brush to selected vertices and also restrict its effect on border zones. This makes smooth adjustments inside a garment, for example, very easy.
The Brush tool has seven (7) different working modes – Move, Relax, Inflate, Standard, SProject, NProject and Select. These offer various translation, fine-tuning and projection methods.
The most conventional ones are the Relax and Inflate modes. The Relax mode relaxes vertices and does reprojection. The Shift key can be used to quickly access relax in a similar way as smoothing in ZBrush and Mudbox. The Inflate mode helps you fix the intersection of low resolution geometry created on top of the hi-res reference mesh.
The Brush tool has built-in support for pressure sensitive tablets. You can adjust its settings and you can also switch it off completely if needed, which is great.
After using this tool for a while, the brush feels pretty fluid and has an overall nice feel to it, as the refresh rate of the brush tip is good and movement feels soft.
Morpher
The Morpher extension can be used to either make last moment fine-tuning changes to a mesh, or create major shape changes to the low polygon retopologized geometry. Thus, it can be used to correct the pose of a character relative to a reference mesh or it can be used to create low resolution morph targets that match the changed shape of a hi-res reference mesh.
Symmetry Planes
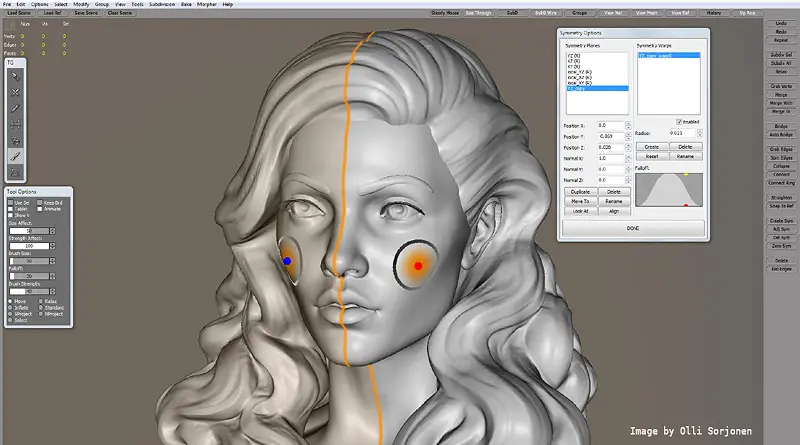
Topogun 2.0 offers quite comprehensive symmetry support – typical standardized symmetry planes exist as default and you can define custom symmetry planes.
Since this tool is clearly supposed to speed up workflow, it would have been nice to be able to manually adjust the symmetry plane using a transform gizmo instead of using numeric inputs or the align function.
Symmetry Warps
The Symmetry Warp tool can be used to retopologize slightly asymmetrical objects. This can be achieved with local space deformers of sorts that you can visually place on the surface of the reference mesh. You start by placing a red manipulator circle on one side of mesh, and then you adjust a blue manipulator on the other side to define the asymmetry. You can create multiple symmetry warps, which will be saved along with the scene.
You can place the symmetry warp on either side of the symmetry plane, which gives you more flexibility. Symmetry Warp tool works pretty neatly, setup is quite straightforward and the end result is predictable.




olha é tudo o que eu preciso para deixar as minhas modelagen mais profissional
Hi,
I have a 3d jet model say 1 million polygons and for texturing i use mari once i model my 3d object then i export it to OBJ and unwrap it,then i import those obj in mari for texturing. Now if i use topogun can i able to reduce the 1 million polygon to lower with keeping same resolution then i export as obj and do my regular texturing stuffs. Is that what Topogun used for??